How to Create AI Explainer Videos with Your Own Company Logo
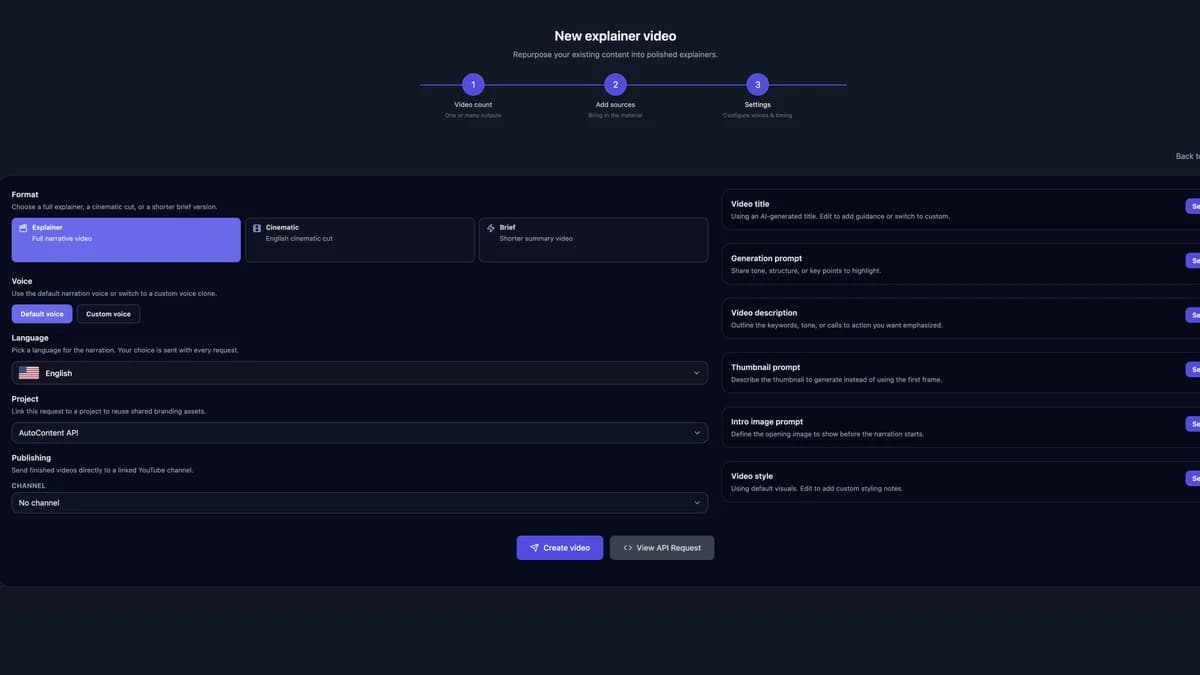
A branded AI explainer video should look like it came from your business, not from a generic video template. That means the video needs your company logo, your brand colors, your product context, and a prompt that tells the system who the video is for. In AutoContent API, the cleanest way to do that is to save your brand once, copy the returned project ID, and pass that ID whenever you generate a video.
This guide shows the full workflow for creating an AI explainer video with your own company logo. First, you will create a reusable branded project in the app. Then you will see the equivalent API calls for creating the project, retrieving the project ID, generating an explainer video with that project ID, and polling until the final branded video is ready.
What you will build
- A reusable brand profile with your company name, logo, colors, and business context.
- A branded explainer video request that uses your website or source material.
- An API payload that passes
projects: ["YOUR_PROJECT_ID"]so the video uses your saved company branding. - A status polling loop that returns the final
video_url, thumbnail, and share URL.
Why Company Branding Matters in AI Explainer Videos
Explainer videos are often used in high-intent business moments: product demos, onboarding flows, sales enablement, investor updates, customer education, feature launches, and internal training. If those videos do not carry your visual identity, they can feel disconnected from the rest of your website, deck, product, and campaign assets.
A saved brand project solves that problem. You define the company context once, attach your logo, set brand colors, and reuse that setup across future videos. For a business, this matters because the content team, sales team, customer success team, and product marketing team can all generate assets that follow the same visual direction.
How AutoContent API Applies Your Logo
AutoContent API uses a saved project as a reusable brand package. The project stores your company description, logo image, and optional colors. When you create content, you pass the project ID in the projects array. The video generation pipeline can then apply the saved company logo and brand context to the generated explainer video and thumbnail.
| Item | What it controls | Where it is used |
|---|---|---|
name |
The internal brand/project name, such as your company or client name. | Project list, project selection, API records. |
description or url |
The business context, positioning, audience, tone, and offer. | Script planning and brand-aware generation. |
imageUrl or imageData |
Your company logo or brand image. The API stores an optimized brand image. | Video frames and thumbnail branding. |
brandColor and accentColor |
Primary and secondary visual accents. | Supported branded outputs and visual direction. |
projects |
Array of saved project IDs to apply to a generation request. | The /content/Create payload for explainer videos and other supported content types. |
Important: The project ID is not your API key. Your API key authenticates the request. The project ID tells AutoContent API which saved company brand package to apply. Keep your API key private and load it from an environment variable in production.
Part 1: Create a Branded Project in the App
The app workflow is useful when you want to create or adjust a brand visually before automating video generation through the API. The screenshots below use AutoContent API itself as the example company, but the same process works for your own company logo, an agency client logo, or a product brand.
Step 1: Open Projects and create a new branded project
In the app, open Projects, then create a new project. Add your company name and a clear business description. The description should explain what your company does, who it serves, the tone you want, and the type of message the video should carry.
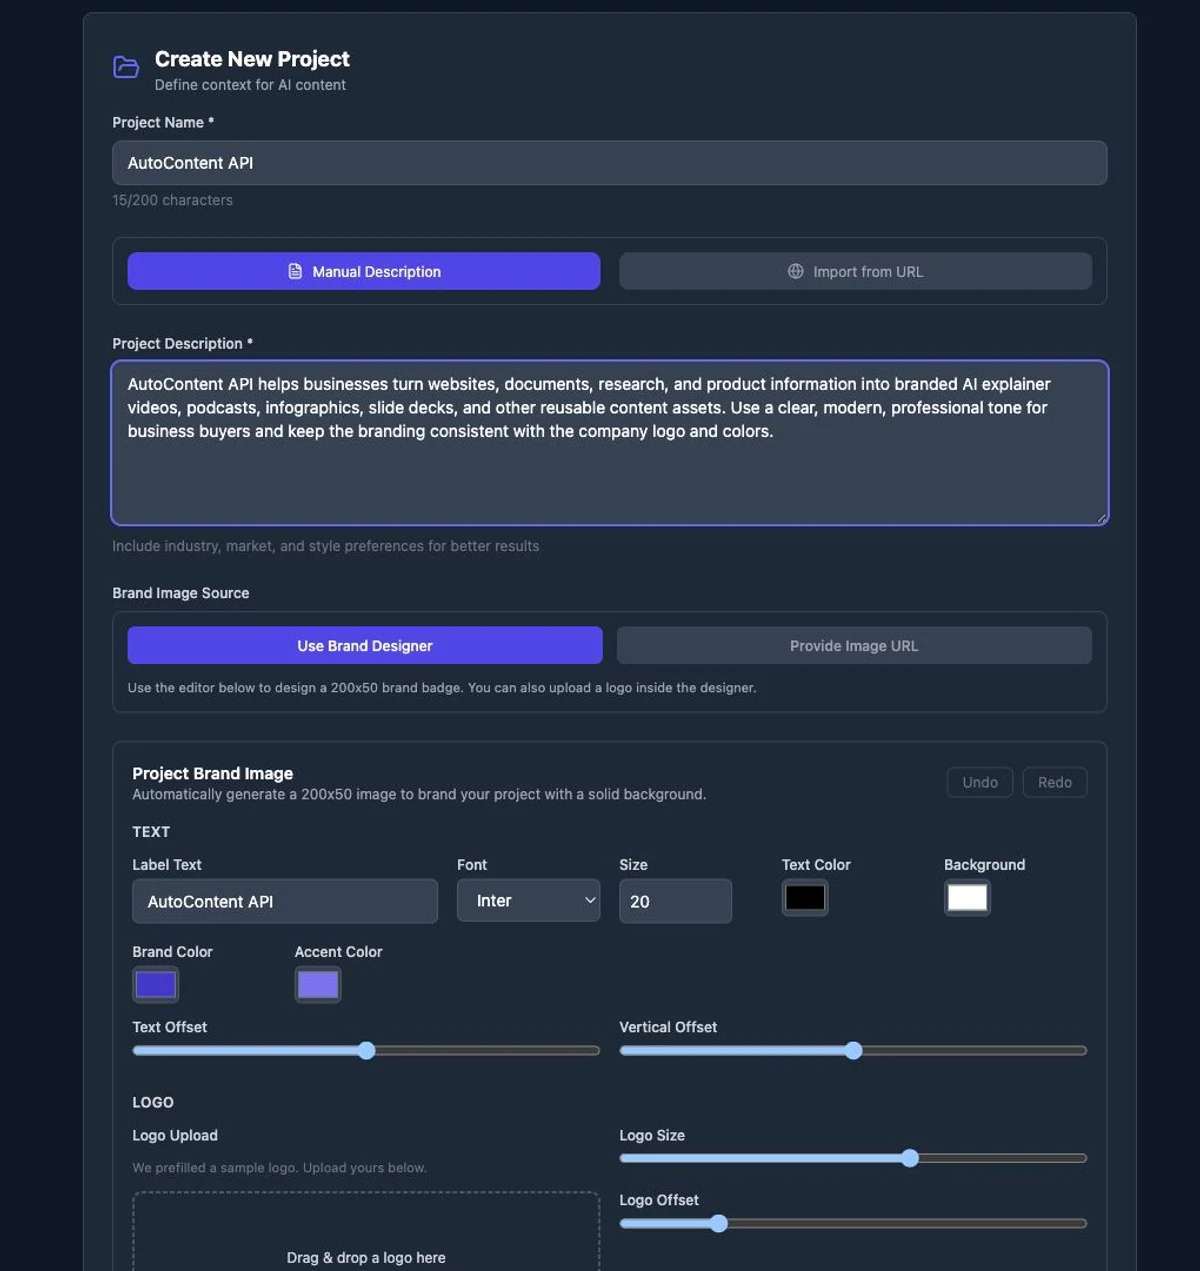
For better business videos, avoid a one-line description. Write the kind of context you would give to a video producer. Include your category, buyer, product promise, use cases, and preferred tone.
Example company context:

AutoContent API helps businesses turn websites, documents, research, and product information into branded AI explainer videos, podcasts, infographics, slide decks, and other reusable content assets. Use a clear, modern, professional tone for business buyers and keep the branding consistent with the company logo and colors.
Step 2: Use your own logo or brand image
The app lets you upload or design a project brand image. For a business explainer video, use your actual company logo whenever possible. A transparent PNG or clean logo file usually works best. If your logo has a wide lockup, make sure it remains readable when scaled down.
You can also set brand colors in the project. Use the same primary and accent colors you use on your website, product UI, sales deck, or style guide. Consistency matters more than decoration: the goal is to make every generated video feel like a natural extension of your brand.
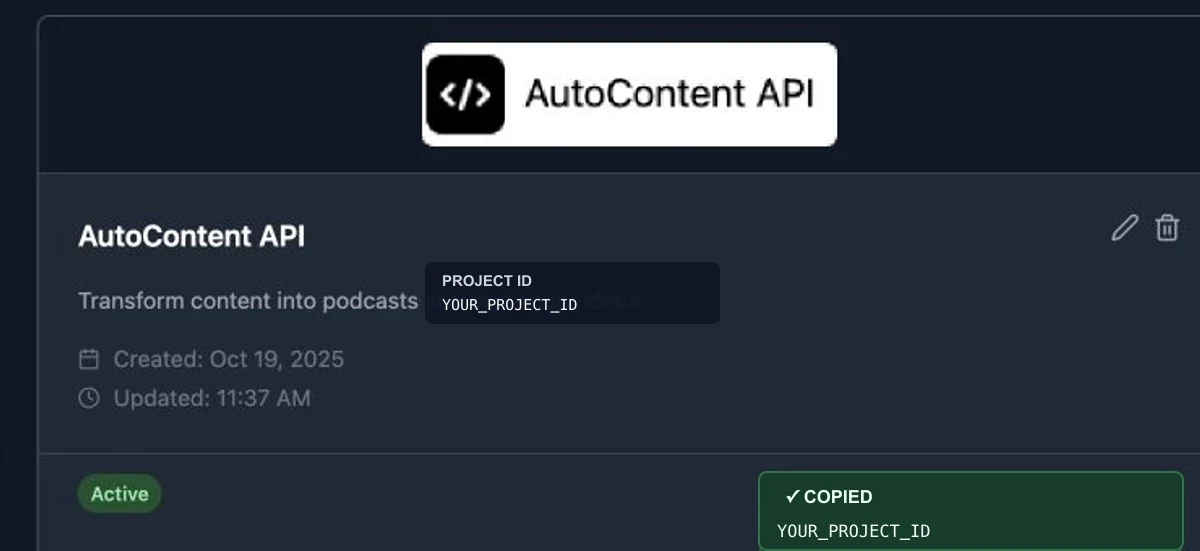
Step 3: Copy the project ID
After the project is saved, copy the project ID from the project card. This is the value you will use in API requests. In code examples and screenshots, replace YOUR_PROJECT_ID with the ID copied from your own account.
Part 2: Generate a Branded Explainer Video in the App
Once your company brand project exists, you can create a branded explainer video directly in the app. This is also a useful way to preview the API payload before you wire the same workflow into your own product or automation.
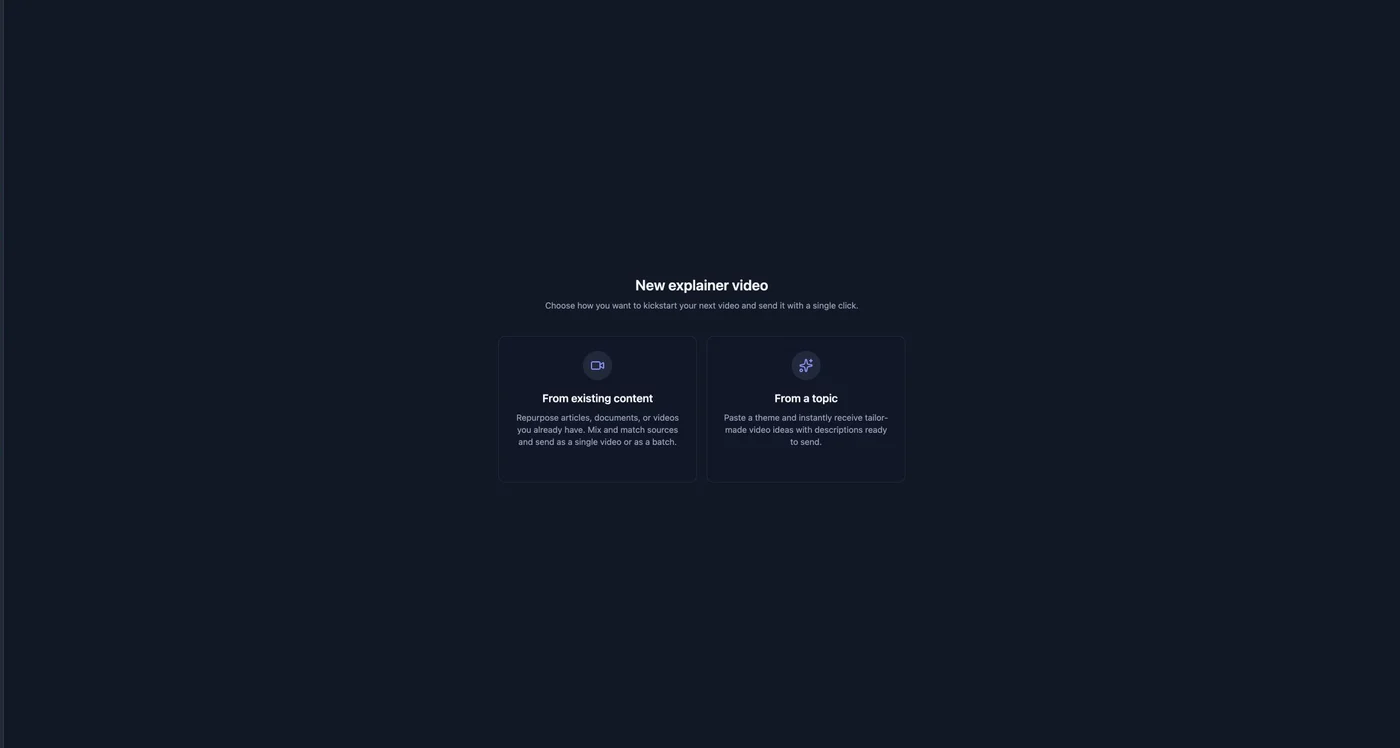
Step 1: Start a new explainer video
Open the explainer video creation flow and choose the workflow that matches your input. For a business explainer, the most common path is to create a video from existing content, such as a company website, product page, documentation page, blog article, or launch announcement.
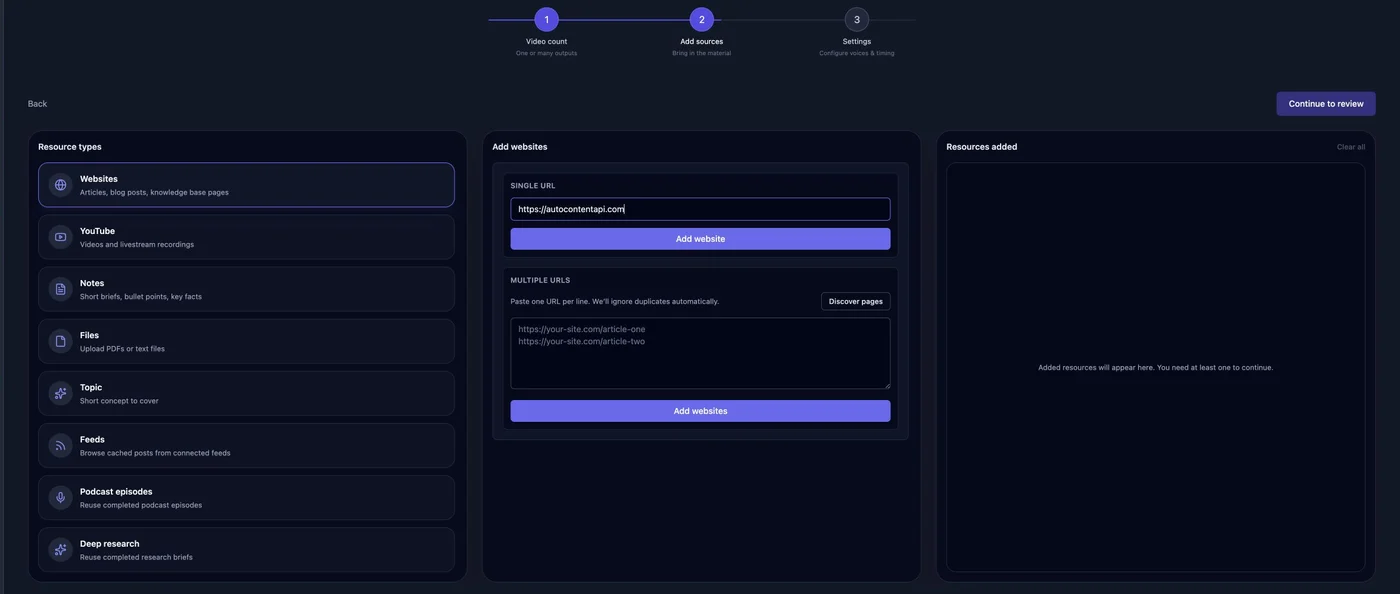
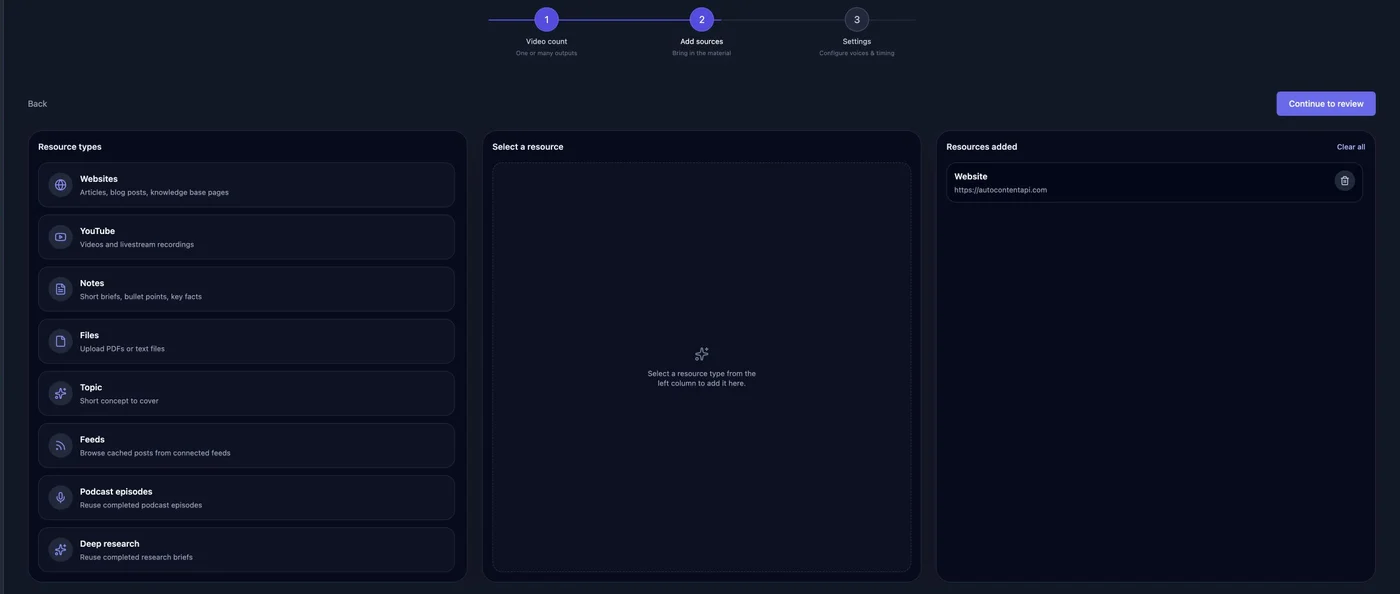
Step 2: Add the company website or source material
Add the source you want the explainer video to use. For a company overview video, the homepage can work. For a product explainer, use a product page, documentation page, help article, or landing page with clearer details.
Step 3: Select your company logo project
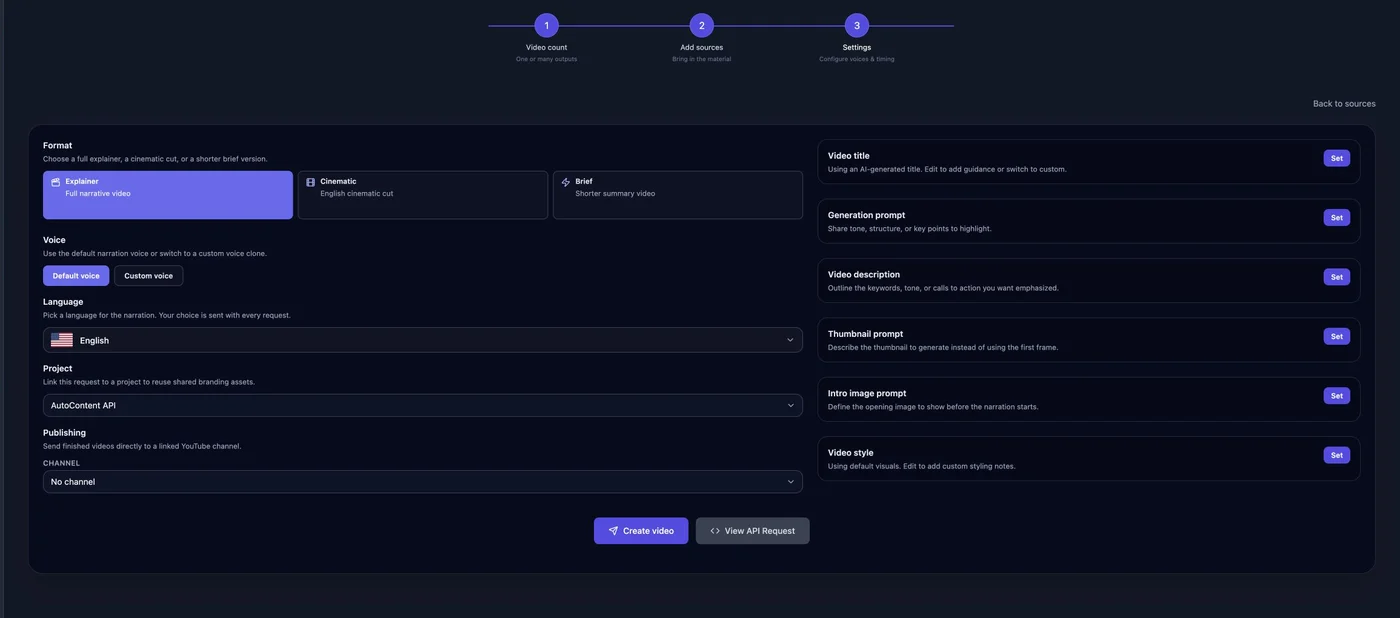
In the review step, select the project that contains your company logo and brand context. This is the app equivalent of adding "projects": ["YOUR_PROJECT_ID"] to the API request.
Step 4: Review the API request
The app can show the equivalent API request before you generate the video. This is helpful for developers because you can validate the exact shape of the payload: outputType, format, resources, text, language, and projects.
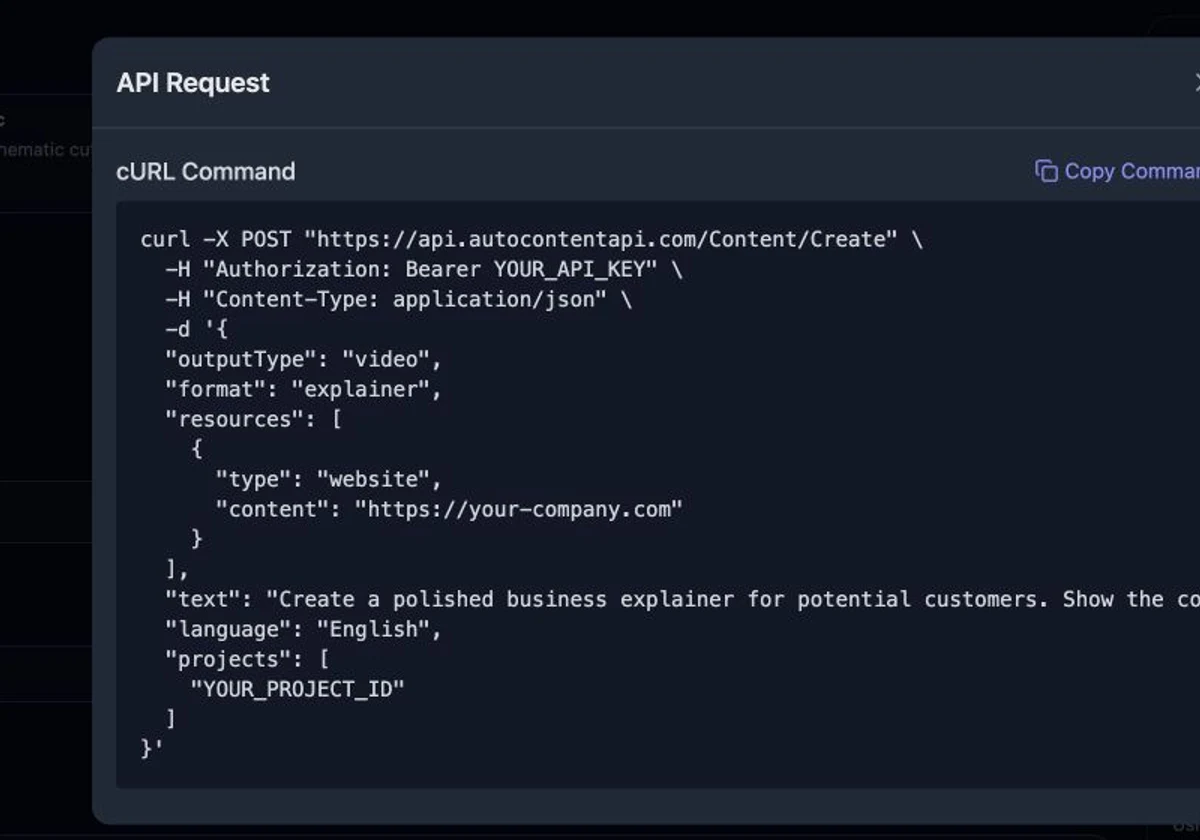
projects array.Step 5: Generate and monitor the result
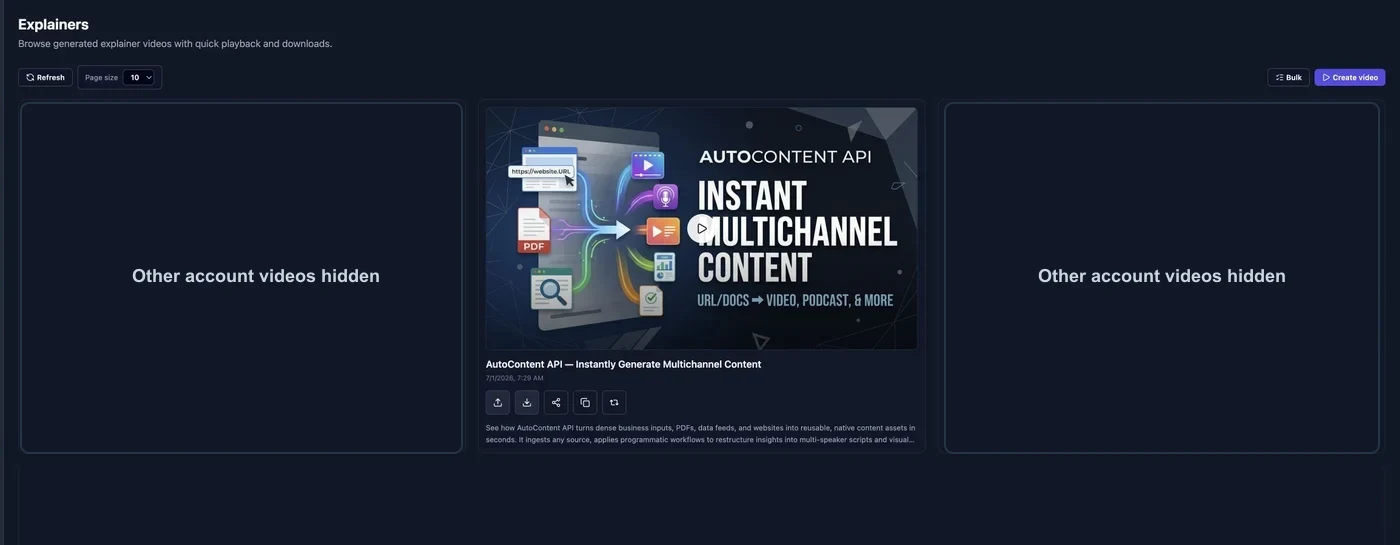
After generation starts, the video appears in your explainer video list when processing is complete. For API automation, you will use the returned request_id and poll the status endpoint until status is 100.
Part 3: Create the Branded Project with the API
If you want to build branded video generation into your own platform, use the API instead of creating projects manually. This is the right pattern for SaaS products, agencies, internal tools, marketplaces, customer onboarding flows, or any workflow where each customer or client needs their own logo and brand settings.
Create a project from a company description
Create a project by calling POST /projects. The only required field is name plus either description or url. To apply your logo, provide either imageUrl or imageData. Do not send both in the same request.
curl -X POST "https://api.autocontentapi.com/projects" \
  -H "Authorization: Bearer $AUTOCONTENT_API_KEY" \
  -H "Content-Type: application/json" \
  -d '{
    "name": "AutoContent API",
    "description": "AutoContent API helps businesses turn websites, documents, research, and product information into branded AI explainer videos, podcasts, infographics, slide decks, and reusable content assets. The tone should be clear, modern, professional, and useful for business buyers.",
    "imageUrl": "https://your-company.com/assets/company-logo.png",
    "textColor": "#111827",
    "backgroundColor": "#FFFFFF",
    "brandColor": "#4F46E5",
    "accentColor": "#7C3AED"
  }'
In a real request, replace the logo URL with a public URL for your own company logo. If you are building a customer-facing integration, you can upload the customer logo to your own storage first, then pass that URL to AutoContent API.
Create a project from a company website
You can also provide a website URL. This is useful when you want AutoContent API to use the website as the basis for the project description.
curl -X POST "https://api.autocontentapi.com/projects" \
  -H "Authorization: Bearer $AUTOCONTENT_API_KEY" \
  -H "Content-Type: application/json" \
  -d '{
    "name": "AutoContent API",
    "url": "https://autocontentapi.com",
    "imageUrl": "https://your-company.com/assets/company-logo.png",
    "brandColor": "#4F46E5",
    "accentColor": "#7C3AED"
  }'
Create a project with base64 logo data
If you do not want to host the logo at a public URL, send it as imageData. Use this when your application already receives an uploaded logo file from the user.
curl -X POST "https://api.autocontentapi.com/projects" \
  -H "Authorization: Bearer $AUTOCONTENT_API_KEY" \
  -H "Content-Type: application/json" \
  -d '{
    "name": "Customer Brand",
    "description": "A B2B software company that helps operations teams automate reporting and customer communication.",
    "imageData": "iVBORw0KGgoAAAANSUhEUgAA...",
    "brandColor": "#0F766E",
    "accentColor": "#14B8A6"
  }'
Project creation response
The response includes the saved project record. The most important field for video generation is project.id.
{
  "success": true,
  "project": {
    "id": "YOUR_PROJECT_ID",
    "name": "AutoContent API",
    "description": "AutoContent API helps businesses turn websites, documents, research, and product information into branded AI explainer videos...",
    "imageUrl": "https://autocontentapi.com/uploads/projects/your-project/logo-200x50.png",
    "textColor": "#111827",
    "backgroundColor": "#FFFFFF",
    "brandColor": "#4F46E5",
    "accentColor": "#7C3AED",
    "active": true
  }
}
List your projects
If you created the project earlier and need to find the ID again, call GET /projects.
curl -X GET "https://api.autocontentapi.com/projects" \
  -H "Authorization: Bearer $AUTOCONTENT_API_KEY"
Part 4: Generate an Explainer Video with the Project ID
Once you have the project ID, pass it in the projects array when creating the video. Even if you are using only one brand project, the field is still an array.
curl -X POST "https://api.autocontentapi.com/content/Create" \
  -H "accept: application/json" \
  -H "Authorization: Bearer $AUTOCONTENT_API_KEY" \
  -H "Content-Type: application/json" \
  -d '{
    "outputType": "video",
    "format": "explainer",
    "language": "English",
    "projects": ["YOUR_PROJECT_ID"],
    "resources": [
      {
        "type": "website",
        "content": "https://autocontentapi.com"
      }
    ],
    "text": "Create a polished business explainer for potential customers. Explain what the company does, why it matters, the main use cases, and the business value. Use a confident but practical tone. Keep the video focused on custom branded content generation and end with a clear call to action.",
    "titlePrompt": "Use an SEO-friendly title for a branded AI explainer video",
    "descriptionPrompt": "Write a concise video description for business buyers and include a clear call to action.",
    "thumbnailImagePrompt": "Create a clean branded thumbnail using the company logo, modern SaaS visual style, and clear contrast.",
    "introImagePrompt": "Open with a professional branded frame that includes the company logo and a concise product promise."
  }'
The creation response returns a request_id. Save it immediately. You need it to poll for the final video.
{
  "request_id": "550e8400-e29b-41d4-a716-446655440000",
  "status": 0
}
Choose the right video format
AutoContent API supports three video formats for outputType: "video". If you omit format, the API defaults to explainer.
If you see the shorter option labeled Brief in the app, use "short" as the API value.
| Format | Best for | Typical business use |
|---|---|---|
explainer |
Balanced default for product, marketing, and education videos. | Homepage explainers, product overviews, onboarding videos, customer education. |
short |
Tighter recaps and shorter social-friendly explainers. | Campaign snippets, launch teasers, quick feature updates. |
cinematic |
More polished storytelling treatment. | High-impact announcements, executive updates, premium brand videos. |
Part 5: Poll Status and Retrieve the Branded Video
Content generation is asynchronous. Poll /content/Status/{request_id} until the status reaches 100.
curl -X GET "https://api.autocontentapi.com/content/Status/550e8400-e29b-41d4-a716-446655440000" \
  -H "accept: application/json" \
  -H "Authorization: Bearer $AUTOCONTENT_API_KEY"
While the request is processing, you may see a response like this:
{
  "id": "550e8400-e29b-41d4-a716-446655440000",
  "status": 5,
  "updated_on": "2026-07-01T10:32:00Z",
  "error_code": 0,
  "requested_on": "2026-07-01T10:30:00Z"
}
When the video is complete, status is 100 and the response includes the generated video URL, thumbnail image URL, title, transcript text, duration, and share URL.
{
  "id": "550e8400-e29b-41d4-a716-446655440000",
  "video_title": "How AutoContent API Creates Branded AI Explainer Videos",
  "status": 100,
  "video_url": "https://storage.autocontentapi.com/video/550e8400-e29b-41d4-a716-446655440000.mp4",
  "image_url": "https://storage.autocontentapi.com/thumbnails/550e8400-e29b-41d4-a716-446655440000.jpg",
  "response_text": "Full narration and generated script text...",
  "requested_on": "2026-07-01T10:30:00Z",
  "updated_on": "2026-07-01T10:35:00Z",
  "error_code": 0,
  "video_duration": 180,
  "share_url": "https://autocontentapi.com/share/video/550e8400-e29b-41d4-a716-446655440000/20260701"
}
Node.js Example: Create Project, Generate Video, Poll Status
The following example shows a simple production-style flow. It creates the branded project, starts an explainer video request, and polls until the video is complete. In a real application, persist both the project.id and the request_id in your database.
const API_BASE = 'https://api.autocontentapi.com'
const apiKey = process.env.AUTOCONTENT_API_KEY

async function autocontent(path, options = {}) {
  const response = await fetch(`${API_BASE}${path}`, {
    ...options,
    headers: {
      Authorization: `Bearer ${apiKey}`,
      'Content-Type': 'application/json',
      ...(options.headers || {}),
    },
  })

  const body = await response.json()

  if (!response.ok) {
    throw new Error(body.error || `AutoContent API request failed: ${response.status}`)
  }

  return body
}

async function sleep(ms) {
  return new Promise((resolve) => setTimeout(resolve, ms))
}

async function createBrandedExplainerVideo() {
  const projectResult = await autocontent('/projects', {
    method: 'POST',
    body: JSON.stringify({
      name: 'AutoContent API',
      url: 'https://autocontentapi.com',
      imageUrl: 'https://your-company.com/assets/company-logo.png',
      brandColor: '#4F46E5',
      accentColor: '#7C3AED',
    }),
  })

  const projectId = projectResult.project.id

  const videoJob = await autocontent('/content/Create', {
    method: 'POST',
    body: JSON.stringify({
      outputType: 'video',
      format: 'explainer',
      language: 'English',
      projects: [projectId],
      resources: [
        {
          type: 'website',
          content: 'https://autocontentapi.com',
        },
      ],
      text: 'Create a polished business explainer for potential customers. Explain the product, use cases, and business value. End with a clear call to action.',
    }),
  })

  const requestId = videoJob.request_id

  for (let attempt = 0; attempt < 40; attempt += 1) {
    const status = await autocontent(`/content/Status/${requestId}`, {
      method: 'GET',
    })

    if (status.status === 100) {
      return {
        projectId,
        requestId,
        videoUrl: status.video_url,
        thumbnailUrl: status.image_url,
        shareUrl: status.share_url,
      }
    }

    if (status.error_code && status.error_code !== 0) {
      throw new Error(status.error_message || `Video generation failed for ${requestId}`)
    }

    await sleep(30000)
  }

  throw new Error(`Timed out waiting for video ${requestId}`)
}

createBrandedExplainerVideo()
  .then(console.log)
  .catch(console.error)
Security note: Do not put your AutoContent API key in frontend JavaScript. Call AutoContent API from your backend, serverless function, worker, or trusted automation environment.
Prompt Template for Branded Business Videos
A strong branded video request combines source material with direct guidance. Use the resources field for facts and the text field for creative direction.
Create a polished business explainer for [AUDIENCE].

Explain:
1. What [COMPANY] does.
2. The problem the customer has before using it.
3. The main product or service benefits.
4. Three practical use cases.
5. Why this is credible or differentiated.
6. A clear next step or call to action.

Use a tone that is [TONE].
Keep the pacing concise and avoid generic hype.
Use the company branding from the selected project.
Best Practices for Custom Branded Explainer Videos
Use a real logo, not placeholder art
The strongest result comes from using your actual company logo. If you are creating client videos, ask for a logo file from the client rather than using a generic image. This keeps the output aligned with the client website, social channels, and sales materials.
Write a project description once, then reuse it
Put durable brand context in the project description: positioning, buyer persona, preferred tone, product category, and business promise. Put request-specific instructions in the video text prompt: the campaign, feature, announcement, or source-specific angle.
Keep one project per brand or client
Agencies and platforms should usually create one project per customer, client, or brand. Store the project ID in your own database next to that customer account. When the customer creates another explainer video, reuse the same project ID.
Use source pages that match the video goal
A homepage is good for a company overview. A feature page is better for a feature explainer. A pricing page can support a buyer education video. A documentation page can support an onboarding or support video. Better inputs usually produce clearer videos.
Store request IDs and final URLs
Production systems should persist the request_id, projectId, source URLs, prompt, status, final video_url, thumbnail URL, and share URL. This makes retries, customer support, analytics, and content libraries easier to manage.
Common Mistakes
- Passing a string instead of an array: Use
"projects": ["YOUR_PROJECT_ID"], not"project": "YOUR_PROJECT_ID". - Forgetting the API key: The project ID does not authenticate the request. You still need
Authorization: Bearer YOUR_API_KEY. - Using a vague project description: A short description like "software company" gives too little context for a branded business video.
- Using an unreadable logo: Upload a clean logo file with enough contrast and avoid tiny text in the logo image.
- Using the wrong source URL: Match the source page to the video goal instead of always using the homepage.
- Polling forever: Add timeout logic, retry policy, and error handling around the status endpoint.
Business Use Cases
Branded AI explainer videos are especially useful when a team needs repeatable video production without starting from a blank timeline every time.
Product marketing
Turn feature pages, launch notes, and positioning docs into branded product explainers for prospects.
Sales enablement
Create account-specific or vertical-specific videos while keeping the company logo and brand consistent.
Customer onboarding
Convert help docs and setup guides into branded onboarding videos for new customers.
Agencies and client services
Maintain one brand project per client and generate videos at scale without mixing logos or brand context.
Frequently Asked Questions
Can I add my own company logo to AI explainer videos?
Yes. Create a project with your company logo using the app or POST /projects, then pass that project ID in the projects array when creating the explainer video.
Do I need to create a project every time?
No. Create the brand project once and reuse its ID. Create a new project only when you need a different brand, client, product line, or logo.
Can I create the project by API instead of the app?
Yes. Use POST /projects with a name, description or URL, and optional logo and colors. The API response includes the project ID you need for video generation.
Which video formats support the project ID?
Explainer video requests use outputType: "video" and support explainer, brief, and cinematic formats. Pass the same projects array with the format you choose.
Is the project ID secret?
Treat it as an internal account-scoped identifier, but not as a substitute for authentication. The API key is the secret. The project ID tells the API which saved brand to apply.
Can an agency manage multiple client brands?
Yes. Create one project per client or brand, store each project ID in your own system, and pass the correct ID for each generated video request.
Start creating branded AI explainer videos
Use the app when you want to visually create and test your brand setup. Use the API when you want to generate branded explainer videos from your own product, workflow, or customer dashboard.
More Articles

Programmatic SEO After AI Overviews: Source-Backed Content Without Scaled Content Abuse

One Source, Seven Assets: Turn a Report into a Podcast, Video, Infographic, Slide Deck, Quiz, Briefing Doc, and Short

Build a Daily AI Briefing Feed from X, Reddit, YouTube, and Deep Research

From Product Feeds to AI Buying Guides: Automating Ecommerce Comparison Content for ChatGPT and Google Shopping

Production Guide: Polling, Webhooks, Retries, and Status Handling for Content Generation APIs
